

Hyper 프로젝트를 하면서 과정 중 어려워했던 파일 업로드에 대해서 다시 공부하게 되었다.
commons-fileupload를 사용하였고 pom.xml에 추가해줘야 한다.
Ajax로 구현해야 하니 Controller에 @ResponseBody를 붙여줘야 한다 이거 또한 사용하려면
pom.xml에 jackson-mapper를 추가해줘야 한다.
pom.xml에 추가해야 할 것. (mvnrepository.com)
1. commons-fileupload
2. jackson-mapper
제일 먼저 파일 업로드를 구현 후 미리보기를 하겠다.
1. spring 폴더에서 xxx-context.xml 에 파일 리졸버를 지정해줘야 한다.
<!-- MultipartResolver 설정 -->
	<beans:bean id="multipartResolver"
		class="org.springframework.web.multipart.commons.CommonsMultipartResolver">
		<beans:property name="maxUploadSize" value="2000000" /><!-- 2MB -->
		<beans:property name="maxInMemorySize" value="2000000" />
		<beans:property name="defaultEncoding" value="UTF-8">
		</beans:property>
</beans:bean>+ application / servlet -context의 차이
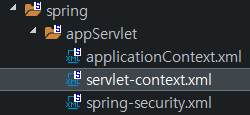
이 두 파일의 차이는 applciationContext는 전체 계층구조에서 최상단에 위치한 컨텍스트로
DB 연결, 로깅 등을 이용한다.
servlet-context는 서블릿에서만 이용되는 컨텍스트이다.
두 개의 차이점 중요!
2. jsp파일을 만들어준다
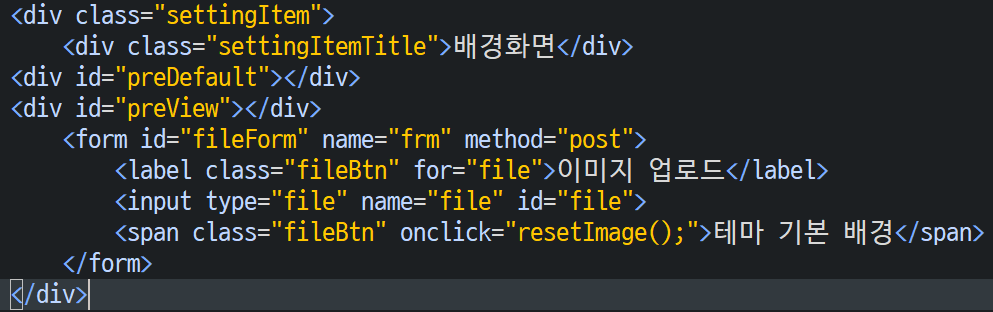
id가 preView인 div가 미리보기를 보여줄 공간이고
input에 요소를 type=file로 해주는 것이 중요하다.
3. 그리고 controller에서 파일을 받기 위해 MultipartHttpServletRequest 인터페이스를 파라미터로 받아줘야 한다.

추가로, Ajax를 이용할 것이기 때문에 @ResponseBody는 필수다. 이 어노테이션을 사용하면 view를 생성하는 게 아니라
JSON이나 Object로 반환해준다.
4. 파일 확인
우선 getFile로 서버에 업로드된 파일의 정보를 객체로 변환해준다.
MultipartFile file = mtf.getFile("file");
파일이 비어있는지 확인하는 메서드 사용해주고
boolean isc = file.isEmpty();
파일이 없을 때는 임의 값으로 업로드해준다.
if(isc==true) {
File_Dto fDTO = new File_Dto(user_seq,"","",0);
isk = fService.imageUp(fDTO);
}else {
5. 파일 업로드
파일이 있을 경우
}else {
	String oriName = file.getOriginalFilename();
	long fileSize = file.getSize();
	String ext = oriName.substring(oriName.lastIndexOf("."));
	String stoName = UUID.randomUUID()+ext;
	String filePath = mtf.getSession().getServletContext().getRealPath("/upload");


	File dir = new File(filePath);
		if(!dir.exists()) {
			dir.mkdirs();
			}
			file.transferTo(new File(filePath,stoName));
			logger.info("경로 : "+filePath+"/"+stoName);
			File_Dto fDTO = new File_Dto(user_seq,oriName,stoName,fileSize);
			isk = fService.imageUp(fDTO);
			map.put("path", filePath+"/"+stoName);
		}
	map.put("isk", isk+"");
	return map;
file.getOriginalFilename() : 클라이언트가 업로드한 파일 원본 이름
getSize() : 파일의 사이즈를 가지고 온다.
filePath = getSession().getServletContext().getRealPath().getContextPath("/upload")
파일 업로드 시 프로젝트 내부 폴더를 이용하기 위해서 상대 경로를 가지고 왔다.
Servers에서 server.xml에 맨 밑 부분을 보면
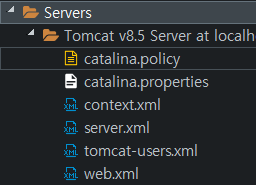
<Context docBase="실제 저장되는 파일의 위치경로" path="서버에서 찾는 파일의 경로" reloadreloadable="true"/>를 추가해주면 된다.
예)
<Context docBase="C:\Users\aejeong\Programming\workspace\org.eclipse.wst.server.core\temp0\wtpwebapps\Hyper\upload" path="/Hyper/upload" reloadreloadable="true" />
이런 식으로 설정을 해놓으면 /Hpyer/upload 라는 경로를 docBase에 설정한 경로에서 찾게 된다.
dir.mkdirs() 폴더를 만들어주는 메서드
transferTo 원하는 위치에 저장해준다. InputStream을 사용해도 되지만 편하니까 이것을 사용한다.
6. Ajax 사용
function ajaxFileUpload() {

    var form = jQuery("#fileForm")[0];
    var formData = new FormData(form);

    jQuery.ajax({
          url : "./imageIn"
        , type : "POST"
        , processData : false
        , contentType : false
        , data : formData
        , success:function(map) {
        }
    });
}
processData : 데이터 객체를 문자열로 바꿀지에 대한 값 true=일반문자/ false=데이터객체
contextType : 일반 text인지 구분하는 값 true이면 일반 텍스트로 구분된다.
data : var formData = new FormData(form)에서의 변수명을 써주면 된다.
파일 업로드는 완성! 다음은 미리보기를 할 예정입니다!
'🌏 WEB > Spring' 카테고리의 다른 글
| Spring 총정리 2.Spring 3대 작동원리 (0) | 2020.06.06 |
|---|---|
| Spring 총정리 1.Spring에 기반이 되는 Servlet (0) | 2020.06.06 |
| 세션 저장소 (0) | 2020.04.29 |
| Spring Security , OAuth2.0으로 구글 로그인 구현 1 (0) | 2020.04.15 |
| JPA Auditing 으로 생성/수정시간 자동화하기 (0) | 2020.04.14 |